


C2630M-C (7/09) 243
Sending E-mail Notifications in Response to Video Loss Events
E-mail notifications can be sent whenever a camera attached to a DX8100 experiences a video loss event.
To cause e-mail notifications to be sent in response to video loss events:
1. On the DX8100 toolbar, click the Setup button . The Setup dialog box opens to the Camera page.
2. Click the Notification button . The Notification page is displayed.
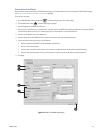
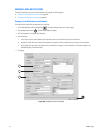
3. Click the Emergency E-mail Notification Setup tab.
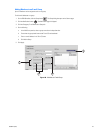
4. In the Notification Items section, do the following:
a. Click the Video Loss check box.
b. In the Selected Channels field, click once to the right of the words Video Loss. The Selected Channels dialog box opens.
c. Do one of the following:
• Click the check box for each channel you want to monitor for video loss detection events.
• Click Select All to monitor all channels for video loss detection.
• Click Deselect All to deselect all channels.
5. Click OK.
6. Click Apply.
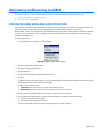
SETTING UP E-MAIL NOTIFICATION GROUPS
The DX8100 allows you to set up groups to send an emergency notification to multiple users. The DX8100 supports the following:
• You can create up to 32 e-mail notification groups.
• Up to 32 members can be assigned to each e-mail group.
• A group can be notified in response to an alarm or motion detection event.
This section describes how to set up e-mail notification groups and includes the following topics:
• Adding an E-mail Notification Group
• Modifying an E-mail Group Name
• Deleting an E-mail Group on page 244
• Adding Members to an E-mail Group on page 245
• Deleting Members from an E-mail Group on page 246
• Modifying E-mail Group Member Attributes on page 247
Adding an E-mail Notification Group
To add an e-mail notification group:
1. On the DX8100 toolbar, click the Setup button . The Setup dialog box opens to the Camera page.
2. Click the Notification button . The Notification page is displayed.
3. Click the Emergency E-mail Notification Setup tab.
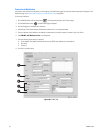
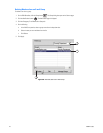
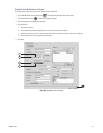
4. In the Mail Group area, do the following:
a. Click Manage Groups. The Group Management dialog box opens.
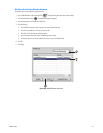
b. Click Add Group. The Manage Groups dialog box opens.
c. Enter the name of the group. (Group names can be up to 32 characters in length and can include spaces, but not special characters.)
5. Click OK.
6. Click Close.
7. Click Apply.