


230 C2630M-C (7/09)
Setting Up Manual Camera Mapping
Manual camera mapping allows a user to customize the capture card analog output. Individual cameras can be assigned to view panels in any
combination. Each customized screen can be added to a sequence list and assigned a specific amount of dwell time. These combinations of
customized screens and corresponding dwell times make up sequence instances: multiple sequence instances can be combined into a sequence
list. The resulting list will sequentially display each instance on an external monitor in a continuous loop. The sequence will continue
uninterrupted until an alarm or motion event overrides the cycle.
The following information should be noted when using the manual camera mapping feature:
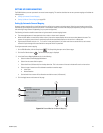
• Eight-channel HVRs offer only the 1 x 1, 2 x 2, and 3 x 3 view panel options.
• If you select more than one screen division, each camera channel will cycle through each screen before the next panel division is presented.
This section describes how to set up manual camera mapping and includes the following topics:
• Creating Monitor Sequence Instances
• Loading an Existing Sequence List on page 231
• Modifying a Sequence Instance in the List on page 232
• Deleting a Sequence Instance from the List on page 233
• Appending an Existing Sequence List on page 234
Creating Monitor Sequence Instances
To add a sequence instance to the sequence list:
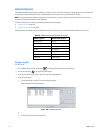
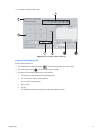
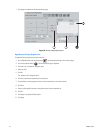
1. On the DX8100 toolbar, click the Setup button . The Setup dialog box opens to the Camera page.
2. Click the Ext. Monitor button . The External Output page is displayed.
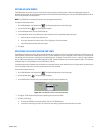
3. In the Manual Camera Mapping Mode section, do the following:
a. Select the Manual Camera Mapping Mode button (if it is not already selected).
b. Select one of the screen division options.
c. Drag cameras from the Site Tree onto each view panel until cameras have been assigned to all panels.
d. From the Min and Sec drop-down boxes, select the amount of time the sequence instance will remain on the monitor.
e. Click Add.
The instance is added to the Sequence Table.
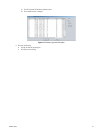
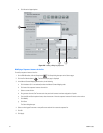
4. Do one of the following:
• Repeat step 3 for each additional sequence instance you want to add to the sequence list.
• If you want to apply the custom setting without saving, click Apply and skip steps 5-9.
5. Click Save. The Save Profile dialog box opens.
6. Select an existing profile or enter a new profile name under which to save the sequence.
7. Click OK.
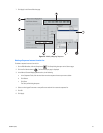
8. In the Sequence Table, click Apply.