


C2630M-C (7/09) 211
MODIFYING USER ACCESS RIGHTS
The Admin user can alter default access rights of lower level users. In this case, any permission granted to a lower level user, must first be
granted to all other higher level users. For example, export rights must first be granted to the Standard user before they can be granted to a
Restricted user.
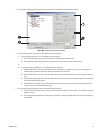
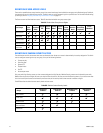
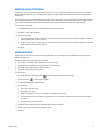
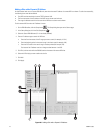
Click the user group buttons to enable/disable the access right for each access category. The access right category is enabled when the button’s
text is red (permission granted), and it is disabled when the button’s text is white (permission not granted). Click a button to toggle the access
right, on and off. Repeatedly clicking the Camera Security button cycles through the security levels (none, low, medium, and high).
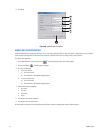
To modify a user’s access rights:
1. On the DX8100 toolbar, click (icon). The Setup dialog box opens to the Camera page.
2. Click (icon). The User page is displayed.
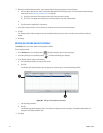
3. Do one of the following:
a. To grant an access right to a user, left click on an access right button above the user’s group list. The text will toggle from white to red
and that permission will be active for that user.
b. To deny an access right to a user, left click on an access right button above the user’s group list. The text will toggle from red to white
and that permission will be denied for that user.
4. Click Apply.
ADDING NEW USERS
Administrators can create new user accounts and modify existing users; this can be done locally on the DX8100 server or remotely from the
DX8100 Client Application.
User names and passwords have the following requirements:
• User names can be between 4 and 20 alphanumeric characters in length.
• User passwords can be between 4 and 10 alphanumeric characters in length.
• User names cannot contain spaces and special characters.
• User names and passwords are case sensitive.
To add a new user:
1. On the DX8100 toolbar, click the Setup button . The Setup dialog box opens to the Camera page.
2. Click the User button . The User page is displayed.
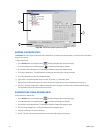
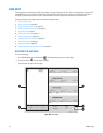
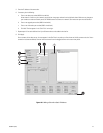
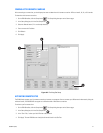
3. Click Add. The Add New User dialog box opens.
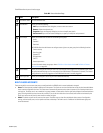
4. Do the following:
a. Enter a login name for the user.
b. Enter the user’s full name.
c. Enter a brief description for the user. For example, enter Building 6 Security Guard.
d. Enter a password for the user. (Passwords must be between 4 and 10 characters in length and cannot contain spaces and special
characters.)
e. Re-enter the same password to confirm.
5. Click Next. The user access level options for the New User dialog box are displayed.
6. Select the user’s access level: Restricted, Standard, or Power.
7. Click Finish.