


C2630M-C (7/09) 163
Understanding the DX8100 Frame Rate Calculations
The DX8100 uses a complex algorithm to calculate the amount of recording resources available for each channel. This calculation takes into
account factors such as the number of enabled cameras; whether uniform or mixed resolution values are used; recording type (continuous, alarm,
or motion); and the frame rate settings of enabled channels. The resulting calculations provide the operator with a margin of available frame rate
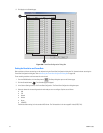
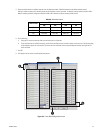
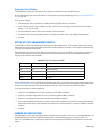
capacity to distribute among the recorder’s channels. This margin of frame rate capacity, or “headroom,” is presented to the user as color-filled
sections of the frame rate sliders. White areas on the slider represent frame rate capacity that is not available to that channel. In certain cases,
adjusting the available frame rates of one channel or resolution type may free up capacity for other channels. Figure 135 shows the available and
unavailable frame rate capacity.
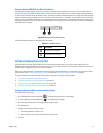
Figure 135. Example of Frame Rate Capacity
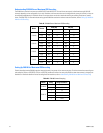
Table AK describes the available and unavailable frame rate capacity.
SETTING UP ADVANCED RELAY OUTPUT
Relays work much like switches. When triggered, relays can activate external devices such as sirens, light fixtures, and door locks. The
DX8100 Series HVR allows Administrators and Power users to link relays to cameras and alarms. Up to 20 seconds of delay can be set from the
moment an event is triggered to the time when a relay is activated.
Make sure you have linked relays to the appropriate cameras and alarm inputs before attempting to configure them. For instructions on linking
alarms and relays, refer to Linking Alarm Inputs to a Camera on page 39 and Linking Relay Outputs to Alarm Inputs on page 40.
This section describes how to setup advanced alarm and motion relay output and includes the following topics:
• Configuring Advanced Motion-Activated Relay Output
• Configuring Advanced Alarm-Activated Relay Output on page 165
• Configuring Advanced ATM/POS-Activated Relay Output on page 166
• Configuring Advanced Video Loss-Activated Relay Output on page 167
Configuring Advanced Motion-Activated Relay Output
To configure a motion relay output:
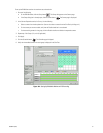
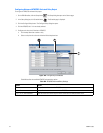
1. On the DX8100 toolbar, click the Setup button . The Setup dialog box opens to the Camera page.
2. In the Setup dialog box, click Schedule button . The Schedule page is displayed.
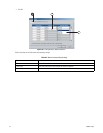
3. Click the Configure Relays button. The Configure Relays dialog box opens.
4. Click the Motion tab.
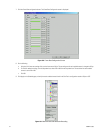
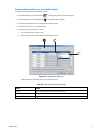
5. Configure each relay that is linked to a camera:
a. Click the drop-down box to select a relay.
b. Select a relay time value from the Activation Period drop-down box.
6. Click Save.
Table AK. Frame Rate Capacity
Item Description
Available frame rate capacity
Unavailable frame rate capacity
ᕡ ᕢ