


190 C2630M-C (7/09)
Deleting a Data Format
To delete an existing data format:
1. In the Network page, click the Port/Device tab. The Port/Device page is displayed.
2. In the Communication Port drop-down box, select a port (Port 1 to Port 4). The device mode option is not available for COM1.
3. In the selected device drop-down box, select an ATM/POS device.
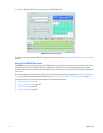
4. In the Communication Port Configuration section, click Configure. The Device Configuration page is displayed.
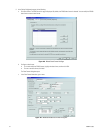
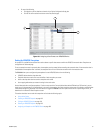
5. Click the Data Format tab. The Data Format List page is displayed.
6. In the Data Format List, highlight the name of a data format.
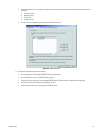
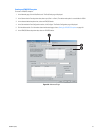
7. Click Delete. A DX8100 message box is displayed prompting you to confirm deletion of the data format.
8. Do one of the following:
• To delete the data format, click Yes.
• To not accept the deletion, click No or Cancel.
Assigning a Data Format to an ATM/POS Device
After you have created a data format, you can assign it to a specific ATM/POS device.
To assign an existing data format to a specific ATM/POS device:
1. In the Network page, click the Port/Device tab. The Port/Device page is displayed.
2. In the Communication Port drop-down box, select a port (Port 1 to Port 4). The device mode option is not available for COM1.
3. In the selected device drop-down box, select an ATM/POS device.
4. In the Communication Port Configuration section, click Configure. The Device Configuration page is displayed.
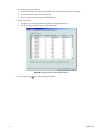
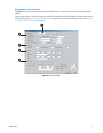
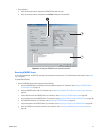
5. Click the Settings tab. The Available ATM/POS Device setup table is displayed.
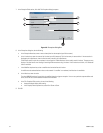
6. In the Data Format column, do the following:
a. In the Device ID column, click the check box to select an ATM/POS device.
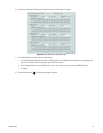
b. Double-click the Data Format cell for the selected ATM/POS device. The Data Format cell drop-down box is displayed.
c. Click in the Data Format cell to display the available data formats.
d. Select the data format you want to assign to the ATM/POS device.