


5-6 Chapter 5 Recording/Playback
Chapter 5 Recording/Playback
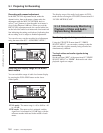
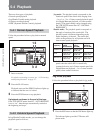
5-3 Preparing for Playback
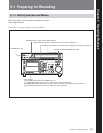
5-3-1 Setting Switches and Menus
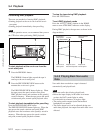
Before starting playback, set the switches and menus
as shown in the diagram below.
For details, see the pages indicated in the parentheses.
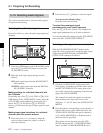
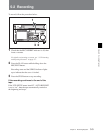
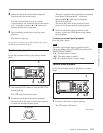
5-3-2 Adjusting the Audio
Playback Level
1 Press the PB LEVEL button at the upper left of the
control panel, to enter the PB LEVEL adjustment
mode.
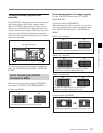
A vertical blue line appears at the right of the audio
level meter for each channel, indicating the PB
LEVEL adjustment mode.
2 Press the button for the channel for which you
want to carry out the adjustment (common with
MONITOR R), to make the channel active. An
orange border appears around the audio level
meter, indicating that it is active.
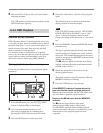
3 Make the adjustment, using the MULTI
CONTROL knob or cursor buttons.
Escaping from the PB LEVEL adjustment
mode
Press the PB LEVEL button at the upper left of the
control panel once more. The vertical blue line at the
right of the audio level meter for each channel
disappears or goes white.
Outputting at the preset level (for a level
recorded at reference 0 dB, outputting at +4
dBm)
In the PB LEVEL adjustment mode, make the channel
active, then press the MULTI CONTROL knob. The
setting becomes the preset value. Press once more to
return to the immediately previous value. Pressing
once more again to return to the preset value. You can
also return to the preset value with the center cursor
button. When you exit the PB LEVEL adjustment
mode, a vertical white line on the right of the audio
level meter is not displayed.
For details on changing the factory-set reference output
level, refer to the Installation Manual.
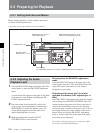
SRW-5000
HD DIGITAL VIDEO CASSETTE RECORDER
MONITOR SELECT buttons: Audio
channels to be monitored (page 5-2)
REMOTE buttons: None of
these buttons light up.
Menu settings
[F1] (TIMER SEL) button in the TC menu: Select the time data to be displayed.
POWER switch: ON
PB level controls:
Playback level