


Chapter 2 Locations and Functions of Parts 2-7
Chapter 2 Locations and Functions of Parts
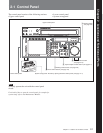
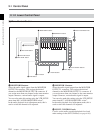
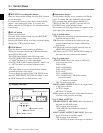
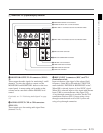
5 SET button
Press to finalize input data.
6 INPUT CHECK button
While you hold down this button, the input signal is
output from the monitor output connector, so that you
can monitor the input video and audio.
When the LTC/VITC time code is shown on the
display, you can check the time code generator.
7 PLAYER/RECORDER buttons
Select which VTR is to be controlled by this VTR’s
control panel during editing when this VTR is used as
a recorder and an external VTR is connected to the
REMOTE 1-IN(9P) or REMOTE 1-I/O(9P) connector
as a player.
PLAYER: The tape transport buttons and editing
operation buttons on the control panel control the
external player VTR.
RECORDER: The tape transport buttons and
editing operation buttons on the control panel
control the recorder VTR (this VTR).
The PLAYER/RECORDER buttons have no effect
when using this VTR alone.
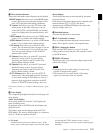
8 AUTO button
When this button is pressed, it lights up and auto edit
mode is activated.
9 Cursor buttons
Use to move the cursor (shown in reverse video) on
the display. Also use to change menu settings.
0 ENTRY button
Press to enter an edit or cue point.
While holding down this button, press either the
AUDIO IN or AUDIO OUT button, or the IN or OUT
button.
qa IN/OUT buttons
To set a IN or OUT point during editing, press either
of these buttons while holding down the ENTRY
button.
qs AUDIO IN/AUDIO OUT buttons
To set an AUDIO IN or AUDIO OUT point during
insert editing, press either of these buttons while
holding down the ENTRY button.
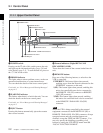
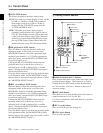
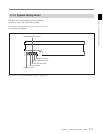
3 Tape Transport Control Section
1 STANDBY button
Press this button in other than standby mode to make it
light up and place the VTR in standby mode. The
head drum rotates in standby mode, thereby shortening
the time required for the tape to start.
Press this button while in standby mode to turn the
button off and exit from standby mode. The head
drum stops rotating and the tape tension is released. If
the VTR remains in standby mode for more than eight
minutes (factory setting), standby mode is
automatically canceled in order to safeguard the tape.
2 PREROLL button
Press to run the tape to the preroll point (a position
factory set to five seconds before the IN point).
Press this button while holding down the IN, OUT,
AUDIO IN or AUDIO OUT button to cue up the tape
at the corresponding edit point.
For details on changing the preroll time, see “4-2-6 Setting
the Preroll Time (PREROLL TIME)” on page 4-18.
3 PREVIEW/REVIEW button
After the edit points are set, press this button to
preview, on the monitor connected to the recorder, the
effect of the edit before it is performed. In this
operation, the tape runs, but no editing is carried out.
If you press this button after carrying out an edit, the
results of the edit are played back on the monitor
connected to the recorder.
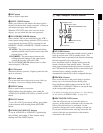
PREVIEW/
REVIEW
REC/EDIT
PREROLLSTANDBY
PLAY
STOP
1 STANDBY button
2 PREROLL button
3 PREVIEW/REVIEW button
4 REC/EDIT button
5 PLAY button
6 STOP button