


C1695M (8/06) 71
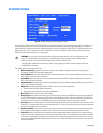
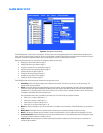
• Alarm Number: Assigns a unique number to the selected alarm in the Alarm list box.
• Silence Alarm: When selected, the alarm for the associated alarm input is silenced.
• Supervised: When selected, the specified alarm input operates in the supervised alarm mode. When an alarm is configured as a
supervised alarm, the DVR5100 maintains a constant electrical current through the alarm circuit (5.0 VDC, 10 kΩ), including a 10 kΩ
resistor. If the resistance changes, due to an electrical short or a bypass, the voltage fluctuates from its normal state. Therefore, the
unit triggers an alarm. For information about wiring an alarm input to operate in the supervised mode, refer to Supervised Alarms on
page 26.
• Severity: Assigns the alarm severity for a particular alarm input. Alarm severity determines the type of alarm (Minor [default],
Normal, Major, Critical) that will broadcast when an alarm condition is triggered. This, in turn, determines which users receive
notification of the alarm.
• Polarity: Selects the polarity for the alarm. Options are Normally Open (default) and Normally Closed.
• Dwell Time: Controls how long an alarm state remains engaged. The dwell time is set from 5 tenths of a second to 1,000 tenths of a
second (100 seconds). The default value is 110 tenths of a second (11 seconds).
• Follow the Input: Controls how long an alarm state remains engaged.When selected, this option causes the alarm state to follow
the input instead of being controlled by the dwell time. In this case, the dwell time option is unavailable. The alarm state is engaged
as long as the event that triggered the alarm is active. For example, if an opened door triggered an alarm, the alarm state is engaged
until the door is closed.
• Comments: Provides instructions or actions that an operator should take if this alarm is triggered. The comments are displayed in the
Alarm Notification dialog box.
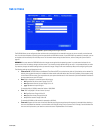
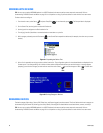
MODIFYING AN ALARM DEVICE NAME
The default name for an alarm device is AlarmArray. You use the default name, modify the name, or create a new name.
TIP: You can use an optional KBD5000 keyboard or a USB PC keyboard and mouse to perform some setup tasks more easily. Refer to
Understanding DVR5100 Controls and Menus on page 31 for a comparison on using any of these devices to work with the on-screen menus.
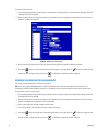
To modify an alarm device name:
1. Select the alarm device on the Devices tab of the Setup window. For information about selecting a device, refer to Working With Devices
on page 68.
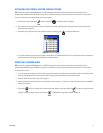
2. In the Device page, navigate to the Name text box where the device name is displayed.
3. Use the Control Pad to modify the device name or enter a new name. Refer to Renaming Devices on page 68 for additional information.
4. Select Apply to save your changes and continue working with settings on this page. Select OK to save your changes and close
the page. To retain the original settings, select Cancel . The DVR5100 main application window is displayed.
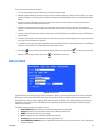
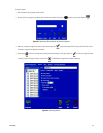
MODIFYING THE ALARM INPUT NAME
For alarm arrays, you can also rename the individual alarms in the array. In this case, you select the alarm number 1 to 16, and then enter a user-
friendly name for the alarm. Assigning a friendly name makes it easier to recognize individual devices on your network. The name must contain
fewer than 100 characters and may include only letters, numbers, or spaces. No special characters are allowed in these names.
TIP: You can use an optional KBD5000 keyboard or a USB PC keyboard and mouse to perform some setup tasks more easily. Refer to
Understanding DVR5100 Controls and Menus on page 31 for a comparison on using any of these devices to work with the on-screen menus.