C624M-C (5/06) 159
Deleting an ATM/POS Exception
To delete an ATM/POS exception:
1. In the Network page, click the Port/Device tab. The Port/Device page is displayed.
2. In the Communication Port Configuration section, click Configure. The Device Configuration dialog box is displayed.
3. Click the Advanced tab. For information on the Advanced page, refer to Setting Up ATM/POS Exceptions on page 155.
4. In the Exception Table, select an exception.
5. Click Delete. The DX8000 message box is displayed.
6. In response to the DX8000 message, do one of the following:
• Click Yes to delete the exception.
• Click No if you do not want to continue with the deletion of the exception.
• Click Cancel to discard the delete action.
Assigning an Exception to An ATM/POS Device
To assign an exception to an ATM/POS device:
1. In the Network page, click the Port/Device tab. The Port/Device page is displayed.
2. In the Communication Port Configuration section, click Configure. The Device Configuration page is displayed.
3. Click the Advanced tab.
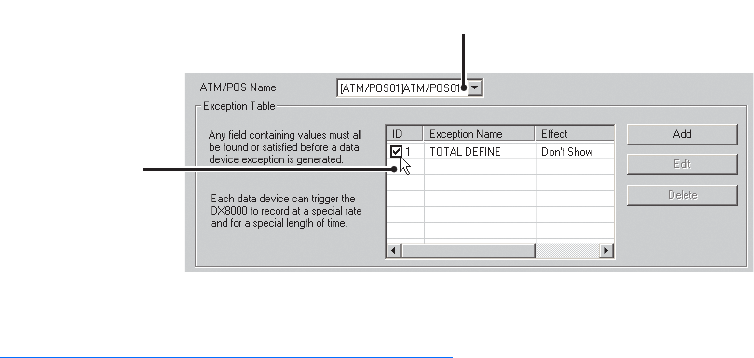
4. In the ATM/POS Name drop-down box, select an ATM/POS device.
5. In the Exception Table, click the ID box of the exception you want to assign to the ATM/POS device selected in the ATM/POS Name drop-
down box.
6. Do one of the following:
• Click OK to accept the changes and exit the Exceptions dialog box.
• Click Cancel to exit the Exception dialog box and not save changes.
Figure 115. Assigning an Exception to an ATM/POS Device
Verifying the ATM/POS Communication Connection
To verify that the ATM/POS connection is working correctly:
1. In the Network page, click the Port/Device tab. The Port/Device page is displayed.
2. In the Communication Port Configuration section, click Configure. The Device Configuration page is displayed.
3. Click the Diagnostics tab.
4. In the ATM/POS Information section, select the ATM/POS device in the Device ID drop-down box.
ᕤ
ᕥ
