166 C624M-C (5/06)
ADDING A BACKUP SCHEDULE
The DX8000 allows you to configure the start time and time range for backing up data. The backup schedule can be configured to run on a daily
basis at a set time and for a specified time range that applies to every day. Or you can set up the backup schedule(s) to run at selected days of the
week. In this case, selecting a weekly backup schedule allows you to customize the start time and time range for each selected day of the week.
The start date and time cannot be set later than the end date and time.
To define the time range of data to be backed up:
1. On the DX8000 toolbar, click . The Setup dialog box opens to the Camera page.
2. In the Setup dialog box, click .
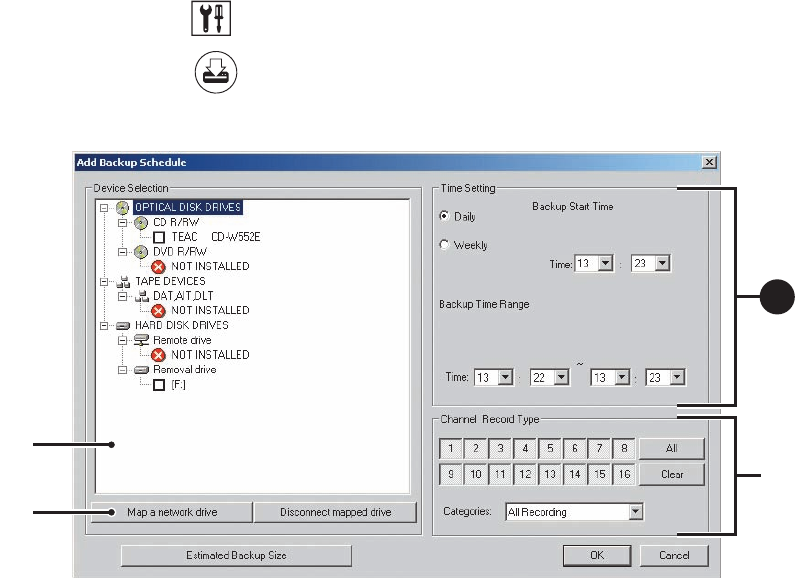
3. On the Backup schedule page, to add a backup schedule, click Add. The Add Backup Schedule dialog box opens.
Figure 119. Add Backup Schedule Dialog Box
4. In the Time Setting section, to set up the time schedule, do one of the following:
a. For daily recording, click Daily if it is not selected, and do the following;
(1) Click the Time drop-down boxes, and select the time you want the backup schedule to start.
(2) Click the Backup Time Range drop-down boxes, and select the time you want the backup schedule to stop.
or
b. For weekly recording, click Weekly if it is not selected and do the following:
(1) Under the Backup Start Time, click the Day drop-down-box. Select the day of the week. In this case, each day represents an
individual backup schedule for that specific day and time constraints you configure.
(2) Under the Backup Start Time, click the Time drop-down boxes, and select the time you want the backup schedule to start.
(3) Under the Backup Time Range, click the Day drop-down boxes. Select the day you want the backup schedule to start and the day
you want the backup schedule to stop.
(4) Under the Backup Time Range, click the Time drop-down boxes. Select the time of day you want the backup schedule to start
and the time you want the backup schedule to stop.
5. In the Channel Record Type” section, select the channel record type as follows:
(1) Click the All or Clear button to select or clear all of the channels at once, or click channel 1–16 individually to select or deselect
a channel.
(2) Click the Categories drop-down box to select the type of recording. The backup schedule includes only the type of recording that
you have specified.
ᕦ
ᕧ
ᕥ
