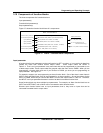
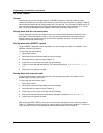
Programming and Operating Concepts
Video Recorder – User Manual 37
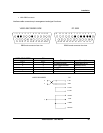
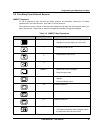
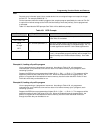
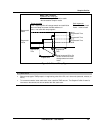
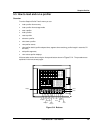
A more detailed explanation of the function of each button appears in Section 3.5.
To develop a feel for navigating between modes, power up the instrument and perform the sequence of
steps that follows.
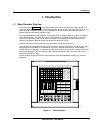
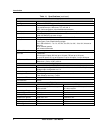
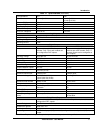
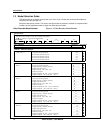
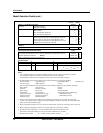
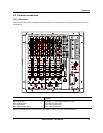
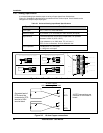
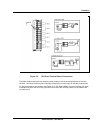
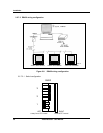
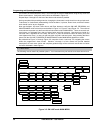
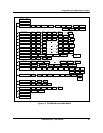
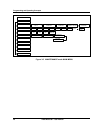
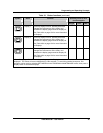
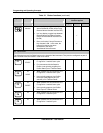
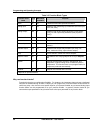
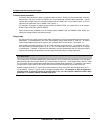
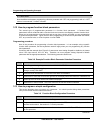
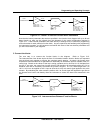
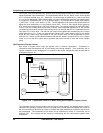
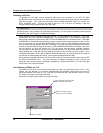
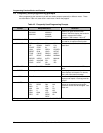
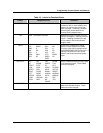
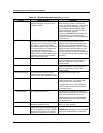
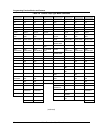
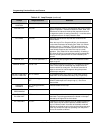
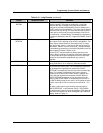
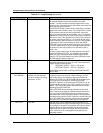
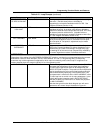
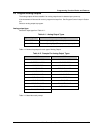
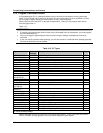
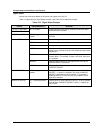
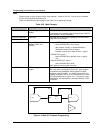
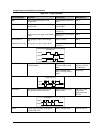
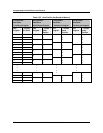
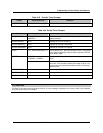
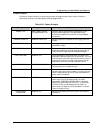
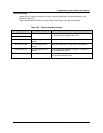
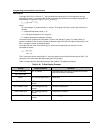
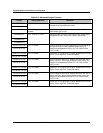
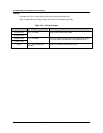
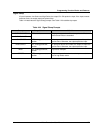
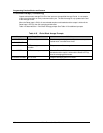
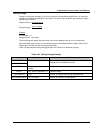
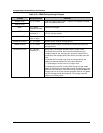
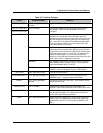
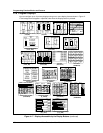
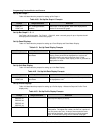
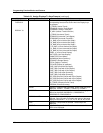
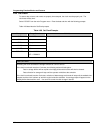
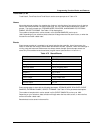
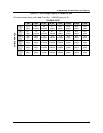
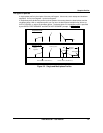
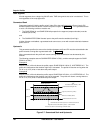
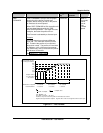
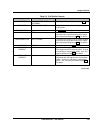
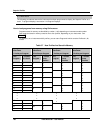
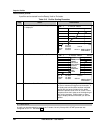
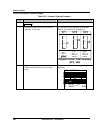
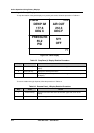
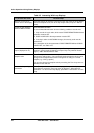
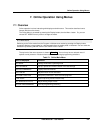
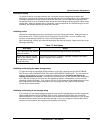
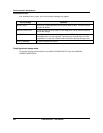
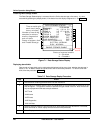
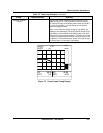
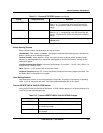
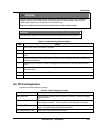
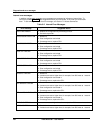
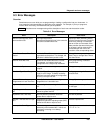
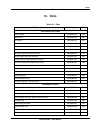
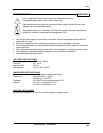
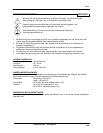
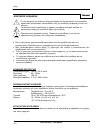
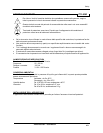
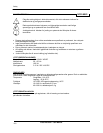
Upon powering up the instrument for the very first time, the logo display will initially appear. Press the
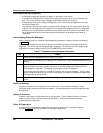
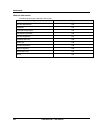
Menu button several times until the ON LINE, PROGRAM, or MAINTENANCE mode MAIN MENU is
displayed. Refer to Figure 3-2. Note: Menus are shown with all possible options; your menu may not
have all options.
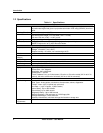
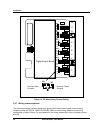
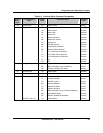
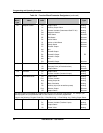
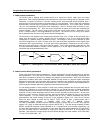
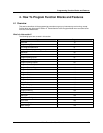
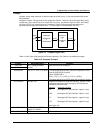
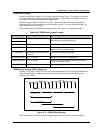
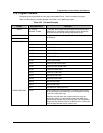
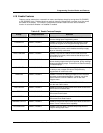
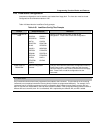
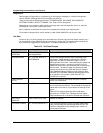
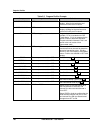
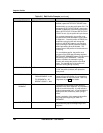
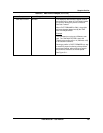
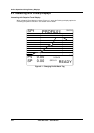
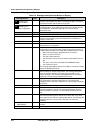
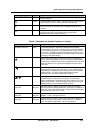
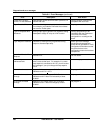
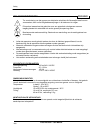
PRODUCT
INFO
S/NYXXXXXXXXXXXXXXX
PARTNUMBER
46900052-001
VERSIONX.X
Product Info Display
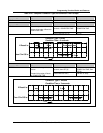
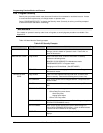
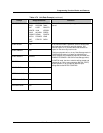
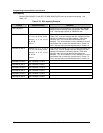
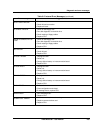
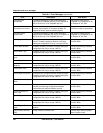
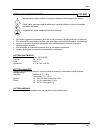
ACCESS SUMMARIES
DATA ENTRY
DATA STORAGE
SETMODE ONLINE
SET ANALOG OUTPUTS
TUNE LOOP
SETPOINT PROFILES
PROGRAM LABELS ANALOG INPUTS CONTROL LOOPS
ALARMS TOTALIZERS
PROFILERS
CONSTANTS
CALCULATED VALUES DISCRETE OUTPUTS DISCRETE INPUTS ANALOG OUTPUTS
COPY BLOCK CLOCK LOAD/STORE CONFIG SCAN RATE
SERIAL COMMUNICATIONS SECURITY FEATURES DISPLAYS
LANGUAGE
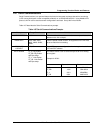
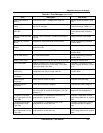
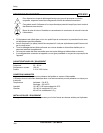
SETMODE MAINTENANCE
CALIBRATE ANALOG INPUTS CALIBRATE ANALOG OUTPUTS
OFF-LINE DIAGNOSTICS
DATABASE SERVICESRESET UNITPRODUCT INFORMATIONMAINS FREQUENCY
WARM START TIME
DEMO
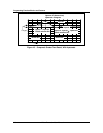
MAIN MENU - PROGRAM
MAIN MENU - ONLINE
SETMODE
MAIN MENU - MAINTENANCE
REVIEW PROGRAMMING
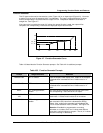
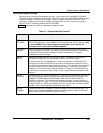
Figure 3-2 Menu Navigation Guide Through ON LINE, PROGRAM, and MAINTENANCE
mode MAIN MENUs.
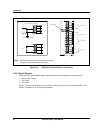
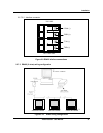
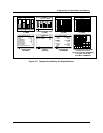
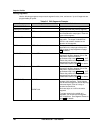
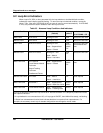
Once you have established which MAIN MENU you are on, use the Up Arrow and Down Arrow buttons
to verify each MAIN MENU choice as indicated in Figure 3-2.
Use the Up Arrow and Down Arrow buttons to find and highlight the menu’s SET MODE prompt.
When the SET MODE prompt is highlighted, press the Enter button.
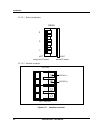
Use the Up Arrow or Down Arrow buttons to switch the instrument to one of the other two instrument
modes and press the Enter button.