


3745 FRU Exchange Procedure
TERMC/TERMR Exchange Procedure
Removal Procedure
1. Inform the customer that the 3745 is to be
powered OFF.
2. Press Power Off on the control panel.
3. Open the front door.
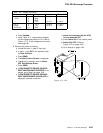
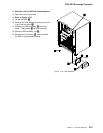
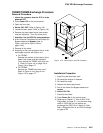
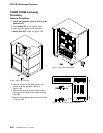
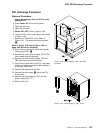
4. Switch CB1 OFF. Refer to Figure 4-81.
5. Locate the basic board. Refer to Figure 4-81.
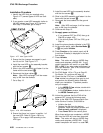
6. Remove the basic board cover (two screws
must be loosened). Then lift up the cover.
7. Attention: Use the ESD kit and procedures.
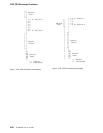
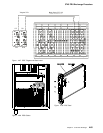
8. At the Channel Tailgate set all the Select Out
Bypass switches to bypass (refer to
Figure 4-43 and to Figure 4-44 on
page 4-36).
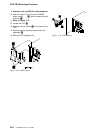
9. Remove all the cards.
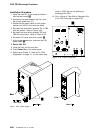
10. According to the card terminator that is to be
exchanged continue with Step a or b.
a. For TERMC:
Release the retainer at the bottom of the
board (one screw must be loosened).
Then remove the TERMC card from row
Z. Refer to Figure 4-4 on page 4-6 or
Figure 4-5 on page 4-7
b. For TERMR:
Remove the TERMR card from row Y.
Refer to Figure 4-4 on page 4-6 or
Figure 4-5 on page 4-7.
Figure 4-81. Basic Board and CB1 Locations
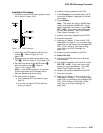
Installation Procedure
1. Install the new terminator card.
2. Re-install the retainer if removed.
3. Re-install the cards.
4. Replace the basic board cover.
5. Set all the Select Out Bypass switches to
normal
6. Switch CB1 ON.
7. Close the front door.
8. Press Power On on the control panel..
9. Referring to Chapter 3, “How to Run 3745
Diagnostics” on page 3-1, run the same diag-
nostic in ODG that you ran before you
exchanged the FRU. Go to “Action to Take
After a Diagnostic Run or an FRU Exchange”
on page 4-99.
Chapter 4. 3745 FRU Exchange 4-61