


Enhancing Video for Security
108
Customizing the "Default" schedule
By default, all of a Multi-Media unit’s cameras and alarms are assigned to the "Default" schedule.
Customizing the "Default" schedule can be the quickest way to coordinate a unit for all cameras
and alarms.
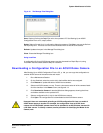
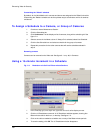
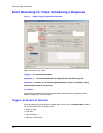
To Assign a Schedule to a Camera, or Group of Cameras
1. Continue or start a Maintenance Session.
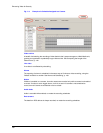
2. Click the Schedules tab.
3. Click Continuous. The tab displays a list of cameras, along with a schedule grid. See
figure 7–4.
4. Select a camera in the Name column. If Always On is selected, select Use Schedule.
5. Click the Use Schedule box and select a schedule for the group of cameras.
6. Repeat this procedure for the other cameras that will use the schedule selected in
step 5.
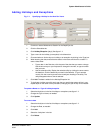
Renaming cameras
Cameras can be renamed on the Video tab. See figure
5–1 on p. 65, in Cameras.
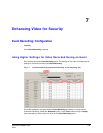
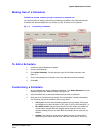
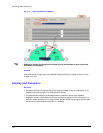
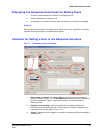
Using a 15-minute Increment in a Schedule
Fig. 7–5. Breakdown of a Cell into Fifteen-minute Sections.
1. In the Time/Day grid, on a day's row, right-click an hour’s cell to display a menu.
2. Click the 15' Breakdown command. A 15’ Breakdown window appears, showing four
fifteen-minute cells for that hour, on that day. See figure 7–5.
3. Click on the cells as needed to schedule one or many of the fifteen-minute periods.
4. To save the setting, click OK. The 15’ Breakdown window disappears.