


System Administrator’s Guide
Document K14392V1 Rev A 141
07/07
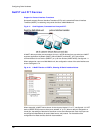
Public Display Monitor: Using Monitor Output 1
A public display monitor can be set up independently of LocalView, on Multi-Media and Multi-
Media LT units. There is no need for converters between the monitor and the Multi-Media unit.
1. Mount a monitor where you plan to have it display a video feed. For NTSC cameras, use
an NTSC video monitor; for PAL cameras, use a PAL monitor.
2. Connect a coaxial cable to the INPUT of the video monitor.
3. Connect the other end of the coaxial cable to MONITOR OUTPUT 1, at the back of the
Multi-Media unit (or Multi-Media LT unit).
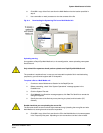
4. Using View, continue or start a Maintenance Session for the Rapid Eye site.
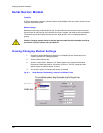
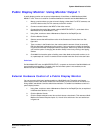
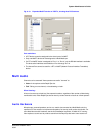
5. Click the Monitor Out tab.
6. Select a camera that will feed the monitor in the Cameras to Choose from box. See
figure 8–8.
7. Type a number in the Duration box; the number sets the amount of time (in seconds)
that the video feed is displayed on the monitor. If only one camera is listed, the duration
is ignored and the feed is displayed without interruption. When many cameras are listed,
you have the option of changing the duration directly in the list by clicking it and typing
another.
8. Click Add. You have the option of adding more video feeds to the public monitor; to do
so, repeat steps 6, 7 and 8. A camera can be included more than once in the same tour.
Color bars
On Multi-Media DSP units, the MONITOR OUTPUT 1 connector on the back of the Multi-Media unit
cannot produce a test pattern. For these units, the Color Bars option is not available, on the
Monitor Out tab of a Maintenance Session.
External Hardware Control of a Public Display Monitor
You can connect a third-party hardware switch to a Multi-Media unit. The switch can freeze a
public display monitor and control whether the next camera or previous camera is monitored. For
wiring details, see table
8–5 and the switch documentation. To enable local hardware control of a
public display monitor:
1. Using View, continue or start a
Maintenance Session for the Rapid Eye site, as explained
in Maintenance Session, on p. 53.
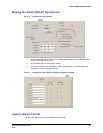
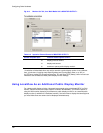
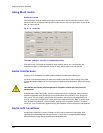
2. Click the Monitor Out tab.
3. Click the Enable external control box so that it shows a checkmark. This reserves a Multi-
Media unit’s General Purpose Inputs 13, 14 and 15 for switch use. You can see the box
in figure
8–8.