


System Administrator’s Guide
Document K14392V1 Rev A 97
07/07
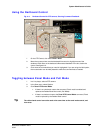
To Setup a Tour of Presets on a RapidDome Camera
1. While using View, select a site that has RapidDome PTZ cameras.
2. Run a
Maintenance Session; click the Video tab.
3. Select a dome camera.
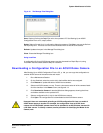
4. Click PTZ. Check if the Driver is “RapidDome/Orbiter”. If not, the remaining steps in this
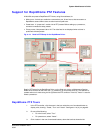
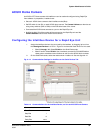
procedure cannot be used. In the “Tour Programming” section, click Preset Tour
(Vector). While a preset tour is being programmed, the RapidDome dome does not
move. You have the option of selecting which of the four preset tours you plan to setup.
To do so, click the arrow button above Dwell Time. See figure 6–11 (2). A list appears,
showing “Vector 1, Vector 2, Vector 3 …” by default. Click the name that you need.
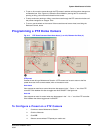
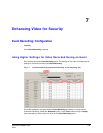
5. To add a preset to the preset tour, right-click in the table in Tour Programming. A menu
appears, showing an Insert command, as in figure
6–11 (1).
6. Click the Insert command. A preset is added to the list.
• Speed. You have the option of setting the time (in seconds) that the dome will
take to reach the preset, by clicking the cell in the Speed column, on the line of
the preset. An arrow appears. Click the arrow and select a value. Click the arrow
and select a value, from “0” to “127”. See figure
6–11 (2).
• Dwell. You have the option of setting the time (in seconds) during which the
dome will stay in the preset position, by clicking the cell in the Dwell column, on
the line of the preset. An arrow appears. Click the arrow and select a value, from
“0” to “255”.
• Preset Name. You have the option of replacing the preset with another, by
clicking the cell in the Preset Name column, on the line of the preset. An arrow
appears. Click the arrow and select a value, from “1” to “127”. Note: preset 100 to
127 can be designated as privacy zones.
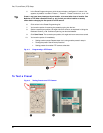
7. Repeat step 6, above, as needed. While adding more presets, you also have the option
of using these commands:
• Move Up/Down. You have the option of moving a preset up or down in the list,
including its Speed and Dwell times. Right-click in the # column, on the line of
the preset; a menu appears. Click Move Up or Move Down, as needed.
• Delete. You have the option of deleting one preset or many from the list, by right-
clicking in the # column, on the line of the preset. On the menu that appears,
click Delete. To select many presets, press and hold the Ctrl key on the PC’s
keyboard while clicking on different lines in the # column.
• Test. You have the option of testing the preset tour by clicking Test. To stop the
testing of a preset tour, click End.
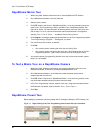
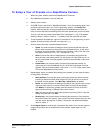
• Rename tour. You have the option of renaming the preset tour. Click inside the
box next to Preset Tour (Vector). Type a name. The name is saved when you next
click the mouse. See figure
6–12, below: “Entrances” has replaced the default
name of “Vector 1”.
8. Click Program Vector to send the tour of presets to the camera. You have the option of
programming another tour of presets for the dome camera; repeat steps 5 to 7 as
needed.