


Touring Many Sites
222
Adding a Site Tour
1. Using Admin, click the Tours tab.
2. To display the Add Tours dialog box, either:
• Click
on the toolbar.
- or -
• Click Add on the Actions menu.
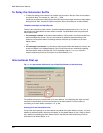
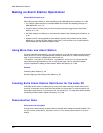
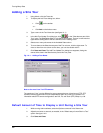
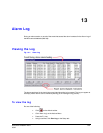
3. Type a name in the Tour Name box (see figure
12–1).
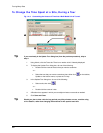
4. In the Add Tour/Update Tour dialog box, click
in the “Sites that are part of this
Tour” pane. The Add/Delete Sites in Tour dialog box appears. The tour’s name must be
typed before adding sites to the tour definition, when creating a tour.
5. Select one or many site names in the Available Sites column.
6. To move them to the Sites that are part of the Tour column, click the right-arrow. To
move an item from one column to the other, you can also double-click it.
7. Click Save and Close. The Add Tour/Update Tour dialog box reappears, listing the
names of the sites in the Sites that are part of this Tour pane.
Fig. 12–1 . Adding a Tour Name.
Note on the word “tour” for PTZ cameras
The meaning of “tour” can be different for some cameras that pan, tilt and zoom (PTZ). PTZ
cameras
can be programmed to move independently when not in use by an operator. For
information about PTZ camera configuration, see
Pan, Tilt, and Zoom (PTZ) Setup on p. 85.
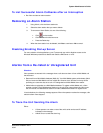
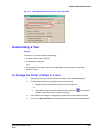
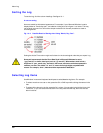
Default Amount of Time to Display a Unit During a Site Tour
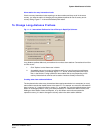
1. While running Admin software, select the Options command in the View menu.
2. Adjust the minutes or seconds, as needed, in the “Default stay of a new Site in a Tour”
option. See figure
12–2.
3. Click Save and Close.