Model 9110T NOx Analyzer EPA Protocol Calibration
Teledyne Analytical Instruments 221
10. EPA PROTOCOL CALIBRATION
To ensure high quality, accurate measurements at all times, the 9110T analyzer must be calibrated prior
to use. A quality assurance program centered on this aspect and including attention to the built-in
warning features of the analyzer, periodic inspection, regular zero/span checks, regular evaluation of test
parameters for predictive diagnostics and data analysis and routine maintenance of the instrument are
paramount to achieving this goal.
The US EPA strongly recommends that you obtain a copy of the publication Quality Assurance
Handbook for Air Pollution Measurement Systems (abbreviated, Q.A. Handbook Volume II); USEPA
Order Number: EPA454R98004; or NIST Order Number: PB99-129876.
This manual can be purchased from:
EPA Technology Transfer Network (http://www.epa.gov/ttn/amtic)
National Technical Information Service (NTIS, http://www.ntis.gov/)
Special attention should be paid to Section 2.3 of the handbook
8
which covers the measurement of NO
2
.
Specific regulations regarding the use and operation of ambient NO
x
analyzers can be found in
Reference 1 at the end of this Section.
If the 9110T is used for EPA compliance monitoring, it must be calibrated in accordance with the
instructions in this section.
A bibliography and references relating to NO
2
monitoring are listed in Section 10.10.
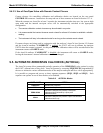
10.1. 9110T CALIBRATION – GENERAL GUIDELINES
In general, calibration is the process of adjusting the gain and offset of the 9110T against a standard with
certified, traceable concentration. The reliability of data derived from the analyzer depends primarily
upon its state of calibration.
In this section, the term dynamic calibration is used to express a multipoint check against known
standards and involves introducing gas samples of known concentration into the instrument in order to
adjust the instrument to a predetermined sensitivity and to produce a calibration relationship. This
relationship is derived from the instrumental response to successive samples of different known
concentrations. As a minimum, three reference points and a zero point are recommended to define this
relationship. The instrument(s) supplying the zero air and Span calibration gases used must themselves
be calibrated and that calibration must be traceable to an EPA/ NIST primary standard (see Section 2.0.7
of the Q.A. Handbook and Table 3-8 of this instruction manual)
All monitoring systems are subject to some drift and variation in internal parameters and cannot be
expected to maintain accurate calibration over long periods of time. Therefore, it is necessary to
dynamically check the calibration relationship on a predetermined schedule. Zero and span checks must
be used to document that the data remain within control limits. These checks are also used in data
reduction and validation. The internal data acquisition system of the 9110T allows to store all calibration
checks (as well as full calibrations) over long periods of time for documentation.
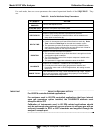
Table 10-1 summarizes the initial quality assurance activities for calibrating equipment.
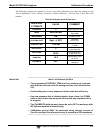
Table 10-2 contains a matrix for the actual, dynamic calibration procedure.


