


Model 9110T NOx Analyzer Instrument Maintenance
Teledyne Analytical Instruments 258
CAUTION – QUALIFIED PERSONNEL ONLY
This procedure is carried out with the analyzer running and its cover removed.
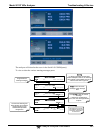
1. Scroll the front panel display to show then test function to PMT.
2. Supply zero gas to the analyzer.
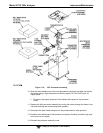
3. With the instrument still running, carefully remove the analyzer cover.
WARNING – ELECTRICAL SHOCK HAZARD
Do NOT touch any of the inside wiring with the metal cover or with your body.
Do NOT drop screws or tools into a running analyzer.
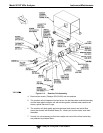
4. Shine a powerful flashlight or portable incandescent light at the inlet and outlet
fitting and at all of the joints of the reaction cell as well as around the PMT housing.
The PMT value should not respond to the light, the PMT signal should remain
steady within its usual noise floor.
5. If there is a PMT response to the external light, symmetrically tighten the reaction
cell mounting screws or replace the 1/4” vacuum tubing with new, black PTFE
tubing (this tubing will fade with time and become transparent).
Note Often, light leaks are also caused by O-rings being left out of the
assembly.
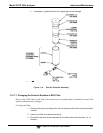
6. If, during this procedure, the black PMT housing end plate for the Sensor Assembly
is removed, ensure to replace the 5 desiccant bags inside the housing.
7. Carefully replace the analyzer cover. If tubing was changed, carry out a pneumatic
leak check.
11.3.12. CHECKING FOR PNEUMATIC LEAKS
CAUTION - TECHNICAL INFORMATION
Do not exceed 15 psi when pressurizing the system during either Simple or
Detailed checks.
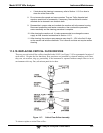
11.3.12.1. Simple Vacuum Leak and Pump Check
Leaks are the most common cause of analyzer malfunction. This section presents a simple leak check,
whereas the next section details a more thorough procedure. The method described here is easy, fast and
detects, but does not locate, most leaks. It also verifies the sample pump condition.
1. Turn the analyzer ON, and allow at least 30 minutes for flows to stabilize.
2. Cap the sample inlet port (cap must be wrench-tight).
3. After several minutes, when the pressures have stabilized, note the SAMP (sample
pressure) and the RCEL (vacuum pressure) readings.