


6-50 Programming MN792
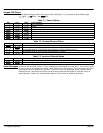
System Port P3 Continued
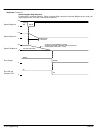
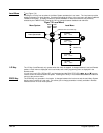
UDP Download (UDP XFER From P3)
A UDP download transfers the actual parameter and configuration settings from the control to a host computer.
This file fully transfers all settings stored in EEPROM in a binary format and can be used as a back up file if the
current drive settings are lost or if the drive is replaced.
Note: A UDP download transfers settings stored in EEPROM since the last Parameter Save was performed.
Any parameter or configuration changes not saved to the EEPROM are not recorded within the UDP file.
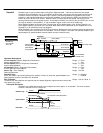
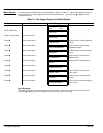
1. Connect one end of the P3 cable to the P3 port and the other end to the PC’s COM port.
2. Ensure that the drive’s P3 Mode is set to Disable.
3. Save the parameter settings using Parameter Save to ensure that the drive’s EEPROM parameters
matches the drive’s current parameter settings.
4. Using a standard communications package, prepare the host computer to receive an ASCII file. Use
a file extension like .MMI to differentiate it from .UDP format files.
5. Enable the host computer to begin receiving data.
6. Start the UDP download from the control by selecting “UDP XFER–> P3”.
Note: Enabling the transmitting port in a serial communications setup initiates data transfer. Therefore, enable
the receiving port the host computer before beginning communication at the drive’s P3 port.
7. The file ends with the CTRL–Z character. This character automatically closes the file in some serial
communications software packages. If not, close the file manually when the PC has stopped scrolling
text. The last line of the file should read :00000001FF.
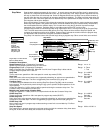
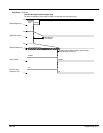
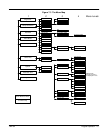
UDP Upload (UDP XFER To P3)
A UDP Upload transfers a parameter file from the PC to the control memory. This information is written directly
to EEPROM, so all the drive’s current settings will be overwritten.
1. Connect one end of the P3 cable to the P3 port and the other end to the PC’s COM port.
2. Ensure that the drive’s P3 Mode is set to disable.
3. Using a standard communications package, prepare the host computer to send an ASCII file. Set the
host computer’s communications port parameters to the settings listed above. Be sure the baud rate
and other COM settings at both ends of the serial communications match.
4. Start the upload by selecting “UDP XFER <– P3”.
5. When the keypad displays “RECEIVING”, begin the file transmission at the host computer.
6. The file ends in a :00000001FF which tells the control to close the file.
7. Reset the control by pressing the “E” key.