


Getting Started 3-5MN792
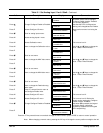
Table 3-1 Set Analog Input 1 for 4–20mA Continued
Action
Description Display Comments
Press M Access Configure I/O menu.
CONFIGURE ENABLE
DISABLE
This is menu level 3. Before any
parameter values can be changed,
Configure Enable must be “Enabled”
(it is normally disabled”).
Press Y
Change Configure Enable to Enabled.
CONFIGURE ENABLE
ENABLED
Note that the LED’s on Keypad are
flashing until changed back to Disable.
Press E Access Configure I/O menu.
CONFIGURE I/O
CONFIGURE ENABLE
Move back one menu level using the
E key.
Press B
Scroll to analog inputs menu.
CONFIGURE I/O
ANALOG INPUTS
Press M Access analog inputs 1 menu.
ANALOG INPUTS
ANIN1 (A2)
Press M Access Calibration menu.
ANIN1 (A2)
CALIBRATION
This is menu level 4.
Press M View or change the Calibration value.
CALIBRATION
1.0000
Use the Y and B keys to change the
value. Press E when finished.
Press E
ANIN1 (A2)
CALIBRATION
Press B
Scroll to next menu.
ANIN1 (A2)
MAX VALUE
Press M View or change the MAX Value menu.
MAX VALUE
100.00%
Use the Y and B keys to change the
value. Press E when finished.
Press E
ANIN1 (A2)
MAX VALUE
Press B
Scroll to next menu.
ANIN1 (A2)
MIN VALUE
Press M View or change the MIN Value menu.
MIN VALUE
–100.00%
Use the Y and B keys to change the
value. Press E when finished.
Press E
ANIN1 (A2)
MIN VALUE
Press B
Scroll to next menu.
ANIN1 (A2)
DESTINATION TAG
Press M View or change the Destination tag
Value menu.
DESTINATION TAG
100
Use the Y and B keys to change the
value. Press E when finished.
Press E Press “E” several times to return to
the Configure Enable menu.
ANIN1 (A2)
DESTINATION TAG
Press M Access Configure I/O menu.
CONFIGURE I/O
CONFIGURE ENABLE
This is menu level 2.
Press M Access Configure I/O menu.
CONFIGURE ENABLE
ENABLED
This is menu level 3. Before the
control can be used again, Configure
Enable must be “Disabled”.
Press B
Change Configure Enable to Disabled.
CONFIGURE ENABLE
DISABLED
Note when B is pressed, the keypad
will briefly display “calibrating”
followed by Disabled and all Keypad
LED’s stop blinking.
Press E
CONFIGURE I/O
CONFIGURE ENABLE
Press the “E” key several times to move back through the menu items or press “PROG” to return to control operation.
Note: When changing a numeric value, pressing the “M” key will change the cursor position one digit to the left.