


Instrument Maintenance Teledyne API - Model 200EH/EM Operation Manual
182
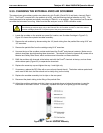
9.3.5. CHANGING THE EXTERNAL ZERO AIR SCRUBBER
The external zero air scrubber contains two chemicals, pink Purafil
©
(Part # CH 9) and black, charcoal (Part #
CH 1). The Purafil
©
converts NO in the ambient air to NO
2
and the following charcoal absorbs any NO
2
. The
chemicals need to be replaced periodically according to Table 9-1 or as needed. This procedure can be carried
out while the instrument is running. Make sure that the analyzer is not in ZERO calibration mode.
CAUTION!
The following procedures apply only to the External Zero Air Scrubber and NOT to the inline exhaust
scrubber cartridge (Section 9.3.3.2) that is part of the pump pack assembly.
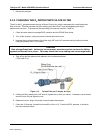
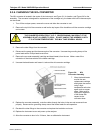
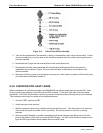
1. Locate the scrubber on the outside rear panel (for location, see Scrubber Cartridge in Figure 3-2).
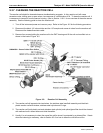
Figure 9-3 shows the exploded scrubber assembly.
2. Remove the old scrubber by disconnecting the 1/4” plastic tubing from the particle filter using 9/16” and
1/2" wrenches.
3. Remove the particle filter from the cartridge using 9/16” wrenches.
4. Unscrew the top of the scrubber canister and discard the Purafil
©
and charcoal contents. Make sure to
abide to local laws about discarding these chemicals. The rebuild kit (listed in Appendix B) comes with a
Material and Safety Data Sheet, which contains more information on these chemicals.
5. Refill the scrubber with charcoal at the bottom and with the Purafil
©
chemical at the top, and use three
white retainer pads (Figure 9-3) to separate the chemicals.
6. Replace the screw-top cap and tighten the cap - hand-tight only.
7. If necessary, replace the DFU filter with a new unit and discard the old. The bottom retainer pad should
catch most of the dust, the filter should not be visibly dirty (on the inside)
8. Replace the scrubber assembly into its clips on the rear panel.
9. Reconnect the plastic tubing to the fitting of the particle filter.
10. Adjust the scrubber cartridge such that it does not protrude above or below the analyzer in case the
instrument is mounted in a rack. If necessary, squeeze the clips for a tighter grip on the cartridge.
Figure 9-3: Zero Air Scrubber Assembly