


Teledyne API - Model 200EH/EM Operation Manual Instrument Maintenance
183
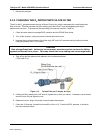
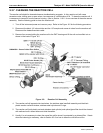
9.3.6. CHANGING THE NO
2
CONVERTER
The NO
2
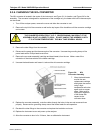
converter is located in the center of the instrument, see Figure 3-1 for location, and Figure 9-4 for the
assembly. The converter is designed for replacement of the cartridge only, the heater with built-in thermocouple
can be reused.
1. Turn off the analyzer power, remove the cover and allow the converter to cool.
2. Remove the top lid of the converter as well as the top layers of the insulation until the converter cartridge
can be seen.
CAUTION
THE CONVERTER OPERATES AT 315º C. SEVERE BURNS CAN RESULT IF THE
ASSEMBLY IS NOT ALLOWED TO COOL. DO NOT HANDLE THE ASSEMBLY UNTIL
IT IS AT ROOM TEMPERATURE. THIS MAY TAKE SEVERAL HOURS.
3. Remove the tube fittings from the converter.
4. Disconnect the power and the thermocouple of the converter. Unscrew the grounding clamp of the
power leads with a Phillips-head screw driver.
5. Remove the converter assembly (cartridge and band heater) from the can. Make a note of the
orientation of the tubes relative to the heater cartridge.
6. Unscrew the band heater and loosen it, take out the old converter cartridge.
Figure 9-4: NO
2
Converter Assembly
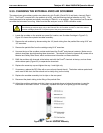
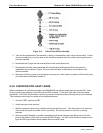
7. Wrap the band heater
around the new
replacement cartridge
and tighten the screws
using a high-
temperature anti-seize
agent such as copper
paste. Make sure to
use proper alignment
of the heater with
respect to the
converter tubes.
8. Replace the converter assembly, route the cables through the holes in the can and reconnect them
properly. Reconnect the grounding clamp around the heater leads for safe operation.
9. Re-attach the tube fittings to the converter and replace the insulation and cover.
10. Replace the instrument cover and power up the analyzer.
11. Allow the converter to burn-in for 24 hours, then re-calibrate the instrument.
04521C (DCN5731)