


Chapter 2 Tutorial
124 Chapter 2 Tutorial
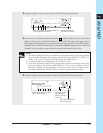
● Section C = Scene button [E]
Using the same procedure as you did for the type A sounds, mute only the LOOP
tracks 1 and 2, and store the mute settings in scene button [E].
● Section D = Scene button [F]
Using the same procedure as you did for the type A sounds, mute LOOP tracks 1/2
and CL tracks 1/2, and store the mute settings in scene button [F].
■ Recording scene recall operations on the sequencer
Now we will record scene recall data on the sequencer for these scene buttons.
To make it easier for you to press the buttons at the correct timing, we recommend
that you turn on the metronome when you record.
Procedure
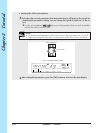
1.
Press the sequencer button to return to the beginning of the song, and press the
button to enter record-ready mode.
▼ The upper part of the display will indicate “REC.”
NOTE:
* The NOTE display will indicate “QUANTIZE=,” but quantize will have no effect when
you are recording scene changes.
2.
Press the sequencer button, and recording will start. The song will automatically
start with the settings of the [TOP] button.
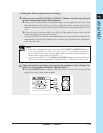
3.
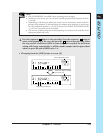
During the time that the MEASURE display changes from 008:4 to 009:1, press scene
button [A].
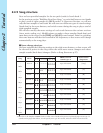
▼ Then in the same way, press the appropriate scene button at the MEASURE loca-
tions shown in the following table to record scene changes.
023:1 Scene button [B]
025:1 Scene button [C]
041:1 Scene button [D]
057:1 Scene button [E]
071:1 Scene button [F]
073:1 Scene button [D]
105:1 Scene button [A]
121:1 Scene button [G]