


2Connectivity and access to an S8100 system
Physical connections
S8100 Installation and Upgrades 139
November 2003
2 Connectivity and access to
an S8100 system
To aid understanding of subsequent chapters, this chapter provides background information about
connectivity and access to an S8100 system.
Physical connections and connectivity are as follows:
• Physical connections on page 139
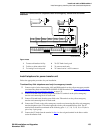
— Direct connection to the RJ45 service jack
on page 140
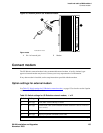
— Direct connection with a local monitor/ mouse/keyboard
on page 149
— Connection via customer’s LAN
on page 149
— Connection via RAS (modem) dial up
on page 149
The access method is determined by the task or access situation:
• Access methods on page 151
— Via a Telnet session
on page 152
— Via a web browser session
on page 153
— Remotely using Avaya Site Administration
on page 156
• Logins for the S8100 on page 158
This chapter begins with procedures for physically connecting to an S8100 with a G600 or CMC1. Once
the physical connection is made to an S8100, you can access the system in any of several ways.
(See Appendix H, “Installation connectivity quick reference”
for a tear-out “cheat sheet” summarizing
physical connections, access methods, and login information.)
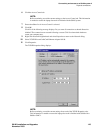
NOTE:
Detailed descriptions of the operation of the Microsoft Windows operating system and
environments are beyond the scope of this document. Please refer to your Microsoft
documentation for details concerning the Windows operating systems.
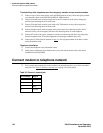
Physical connections
Use any of the following methods to create a physical connection to S8100 system:
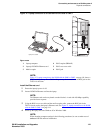
• Direct connection via RJ45 jack on the TN2314 faceplate
• Direct connection via local monitor/mouse/keyboard
• Customer LAN
• RAS (modem) dial up
• DEFINITY LAN gateway (DLG)