


Checklists and job aids
Replace an S8100’s hard drive
20 S8100 Installation and Upgrades
November 2003
Replace an S8100’s hard drive
This Job Aid provides the steps for replacing the hard drive on the S8100 Media Server (TN2314) circuit
pack. The media server’s software release on the new hard drive may be the same as, or later than, the
software release on the hard drive to be replaced. If the media server’s software release on the new hard
drive is earlier than the software release on the hard drive to be replaced, you must upgrade the software
on the new hard drive after the replacement.
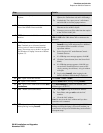
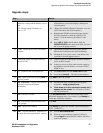
Access keys
The access method for each step is identified by the following keys:
Upgrade steps
LT Technician’s laptop
LT-IE Internet Explorer / Web interface on the laptop
SDT S8100’s Windows desktop
SDT-IE Internet Explorer/Web interface on the S8100’s Windows desktop
(Note that SDT and SDT-IE are opened inside of LT-IE.)
BS Bash shell on S8100’s Windows desktop
LAC LAC shell
SAT System-administration terminal
{...} Information in braces is for Windows 2000
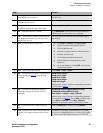
Step Details
1 For a direct connection between the technician’s
laptop and the S8100’s service port.
LT – Change the laptop’s IP address to
192.11.13.5
a Right-click the 'Network Neighborhood' {My
Network Places} icon on the laptop’s desktop and
select Properties.
b {Right-click ‘PCMIA Ethernet Connection’ (or
Local Area Connection) and select Properties.}
c Highlight the TCP/IP icon from the popup
window and select Properties. Check the ‘Specify
an IP address’ {‘Use the following IP address’}
radio button.
d Enter 192.11.13.5 in the IP address field and
255.255.255.252 in the subnet mask field and
click OK to close the popup windows.