


IMap CD-ROM for an S8100 upgrade
Connect to and access the S8100
S8100 Installation and Upgrades 341
November 2003
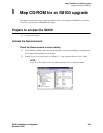
4 Click the Apply button to enable your changes.
5 Click OK to close the Properties dialog.
6 At the My Computer window, verify that the CD-ROM device is now marked with a hand.
Connect to and access the S8100
Prepare to access the S8100’s desktop
1 If this is an R9.5 S8100 system, use pcAnywhere to access the S8100’s Windows desktop. If not
(R10
+
), use Remote Desktop Client.
NOTE:
Whereas, Remote Desktop Client is a free application – pcAnywhere is not and must be
preinstalled on your laptop.
NOTE:
Avaya does not support the Remote Desktop Client application.
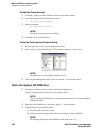
2 If necessary, download the current Remote Desktop Client from the following Microsoft link:
http://download.microsoft.com/download/whistler/tools/1.0/wxp/en-us/msrdpcli.exe
Connect to the S8100
1 Directly connect to the S8100’s services port. For details, refer to Direct connection to the RJ45
service jack on page 140.
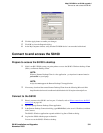
2 Open the laptop’s Remote Desktop Client application.
3 In the Remote Desktop Connection dialog, type 192.11.13.6 (as the server’s IP address) and then
click Connect.
The S8100’s Windows application responds with the Log On to Windows dialog.
4 Log into the S8100 with the proper credentials.
You are now at the S8100’s Windows desktop.