


1 Install and cable a G600 cabinet
Install and cable a G600 cabinet
68 S8100 Installation and Upgrades
November 2003
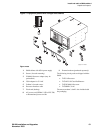
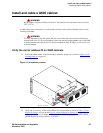
Rack mount a G600 cabinet
!
WARNING:
Verify that the customer-supplied standard 19″rack is properly installed and solidly secured to the
floor. If not, do not proceed with the installation.
1 Be sure the door has been removed.
2 Remove every circuit pack and the power supply.
!
WARNING:
When handling a circuit packs or any component of the G600, always wear an authorized wrist
ground strap connected the ground connector provided on the system’s cabinet. During a cabinet’s
installation, store circuit packs so that they will not be damaged by electrostatic discharge.
3 If necessary, prepare the G600 for mounting in the medial position by removing the screws on the
mounting brackets, moving the brackets to a position midway on the cabinet, and installing the
screws through the mounting bracket and into the cabinet’s holes.
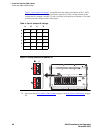
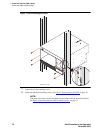
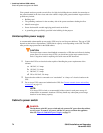
4 Using the rack-mounting guide, locate a set of rack holes to be used for mounting. Note the
position of the upper key-hole shaped slots on each rail.
NOTE:
The mounting screws’ holes are not evenly spaced on a 19″rack. Be sure the holes selected
to mount a G600 are positioned to match every mounting-bracket slot on the guide. See
Figure 6, Checking rack’s mounting holes and placing first mounting screws,
on page 69.
!
WARNING:
Installing the top G600 higher than shoulder level on the rack is not recommended.
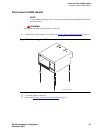
5 Insert two mounting screws into the left and right rails of the rack in the holes noted in step 4.
Leave enough space between the screw head and the rail surface to accept the mounting bracket.
See Figure 6, Checking rack’s mounting holes and placing first mounting screws,
on page 69.
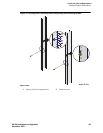
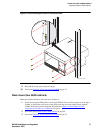
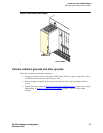
6 Lift the empty G600 and slide the key-hole slots on the mounting brackets onto the two mounting
screws.
!
DANGER:
Use lifting precautions! An empty G600 weighs 15.8 – 17.6 kg (35 – 39 lbs).