


Checklists and job aids
Upgrade an S8100’s R9.5 software by replacing the S8100
30 S8100 Installation and Upgrades
November 2003
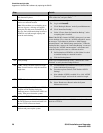
27 BS – Administer the customer’s parameters
that you wrote down in Step 6
, using the
setip command.
setip name=<args>
setip cust=<args>
setip dns=<args>
setip wins=<args>
setip ras=<args>
Replace each “<args>” with the corresponding parameter you
recorded in Step 6
.
28 BS – Administer the product ID and OSS
parameters using the ‘productid’ and ‘oss’
commands.
productid multivantage-product-id <arg>
productid audix-product-id <arg>
oss <telno> <retries> <retry_interval>
Replace each “<arg>” with the corresponding parameter you
recorded from Step 15
. For the oss command, enter the
<telno>, <retries>, and <retry_interval> parameters
separated by spaces; do not enter commas.
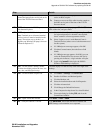
29 BS – Telnet into the LAC window from the
bash.
Execute telnet 127.1 and login using lucent3.
30 LAC – Install the new license and password
file from the LAC window using the
lucent3 login.
For details, see Chapter 3 in Installation and Upgrades for the
Avaya S8100 Media Server with the Avaya G600 and the
Avaya CMC1 Media Gateways, 555-233-146.
31 LAC – Exit the LAC window and bash
shell.
a Type exit, and close the telnet window.
b Type exit to close the bash window.
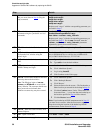
32 SDT – Open Internet Explorer on the
S8100’s desktop and login.
a Double-click the IE icon on the S8100’s desktop.
b Click ‘Administer System’.
c Log in using lucent3.
d Click Continue on the Notice page.
33 SDT-IE – Restore the translations and other
backed-up data to the hard drive.
Note: The Windows logins of vm, sa,
browse, and NTadmin are reset to their
factory defaults. The customer should reset
these passwords and reinstall other
Windows accounts they may have created.
a Click ‘Administer System.’
b Click ‘Backup & Restore.’
c Click ‘Restore.’
d Select the Source for the restore – The Destination or
Other location you entered for the backup in Step 12
.
e Click the Continue button. Under “These items will
be restored from ... “, every item that was backed up to
the location specified in Step d
will be selected.
f Click the Restore button.
Note: If you backed up AUDIX announcements in Step 12
,
you must do two restores. After the first restore, repeat the
steps above using the location of the backed up AUDIX
announcements for the Source in Step d
.
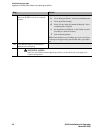
34 SDT-IE – When the restore finishes, close
Internet Explorer.
35 SDT – Open a bash shell. Click Start → Run → bash.
36 BS – Shutdown every application. Execute shutdown all.
Step Details