


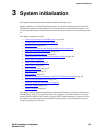


3 System initialization
Obtain the installation script file
166 S8100 Installation and Upgrades
November 2003
8 Adobe Acrobat Reader application installed on your PC (to read FET documentation)
9 Internet Explorer 5.0 or higher installed on your laptop/PC
10 Intranet access to your designated RFA portal (See the following URL list.)
Go to the RFA web site
The Remote Feature Activation (RFA) web site automates some of the installation procedures, including
generating license and password files.
1 At your laptop/PC browser, go to the RFA web site:
http://www.avaya.com/services/rfa
2 Using your SSO, log into the RFA web site.
3 Follow the links to the RFA Information page.
4 Complete the information necessary to create and deliver license and password files.
Obtain the installation script file
NOTE:
An installation script is needed only if the customer has a maintenance contract with
Avaya.
You can download an installation script from the Automatic Registration tool’s (ART’s) web site.
Direct channels
For a direct channel (inside or outside the US), go to:
http://spiexp1.eng.avaya.com:8000/cgi-bin/ART/ARTstart.cgi
and follow these steps:
NOTE:
If you do not have a user ID and password for the ART database, select Administer my
ART user ID and password and follow the instructions to create a new ID and password.
1 Select “Administer an S8x00 Server product for an install script”.
2 Enter your ART user ID and password.
3 Record the ART session ID.
4 Enter the RFA System ID and the RFA Module ID, if applicable. If you do not have these ID
numbers, enter the FL Number.
5 For Session Type, check the “Install Script for S8x00 Products”.
6 For Product Type, select the “ECLIPS IP600”.
7 Click the “Start IP Address Administration” button.